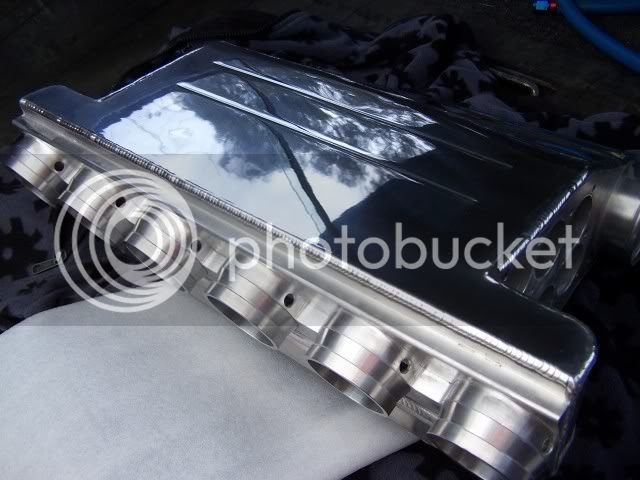
Twin M45 charged 1uzfe project taking shape

The 1UZFE EGR Delete Kit is available for sale here.
Can't go wrong with BRG, but to me the T70 is an outrageous design and needs an outrageous color. The blue/yellow combo looked good on one of the originals that I remember. I might even be tempted to do burnt orange, lime green, or other lambo type colors, particularly if I was going to put it on the track.

But the red one in your pic looks nice too!
 
Hey Cobber,

yeah I know Doug for quite a few years now! nice bloke and has joint the same forum as I did many many moons ago, (locostbuilders.co.uk)

it will however be a street car, though be it a very quick street car... also the ocaasional visit to germany's Ring will probably be in order :-)
Oeh just remembered they're building a new F1 track in france in a village called Flins, my sister lives about 17km away from it.... hahahah me = one lucky chap!

@John, I was thinking the same thing, but I would like to have it look very posh, I've had a eye hurting yellow Seven type car for years so now want something different.
On the GD demo car they have carbon striping layed into the mould so that the bright orange gelcoat is flush with the carbon and a nice clear coat is over both, so the carbon is actually inside the body making for a very nice thing to look at, the body colour being organge and the striping apears to be 10feet deep into that body, strange to see but very nice.

I was thinking if they could make that same effect woth alluminium matting instead of carbon and then have a bordeaux red (or something)base colour, and have the chassis coated in the same colour/shade as the alloy in the striping...... as are the 18" wheels
then again bright silver and bright oragne combo isn't to bad either...... hmmm

other idea is to have a old porsche white bas colour and the striping in carbon as per the GD demo, also very high standard, but then the rollbar and wheels have to be black.....

grtz Thomas

PS I absolutly HATE brittish racing green, for F*** sake man, my garden fences are brittish racing green, a little to much agricultural in my eyes,
luckily this is an opinion of a cheap ass dutchy who even thinks his 1997 honda accord in dark red is a nice car to look at.......
 
so basicly..... That's going to be nice!

give me some optuion on colour btw I cannot decide, the chassis will be powdercoated silver-grey

Grtz thomas

LOL understatement of the year :)

Hmm some superbright yellow with twin racing stripes of your choice....i'd actually go for BRG stripes :)
 
LOL understatement of the year :)

Hmm some superbright yellow with twin racing stripes of your choice....i'd actually go for BRG stripes :)

So you want a guy from Holland to paint his car Australian green and gold? Nice! :fing02: :joke:

I think the colour scheme should fit with the theme and attitude of the car. ie. should it be subtle, sharp, aggressive, sleek, ...? Once you know what you want the car to 'say' when people see it, you can work on colours and styles to suit. Or maybe this is over thinking it and you should just go with your gut? :)
 
Nail on the head Dazz,

that Justin is one sneeky bastard, trying to promote his own country through my ignorance, didn't realize the national coulours of Aus are indeed those..... hahaha.

anyway dicisions has been made.

base coulour will be black, chassis rollbars and suspension bits will be silver. and the twin stripes over the car will be silver carbon inlayed in the body itself. so the black and the stripes sit under the same clear gelcout layer, the effect will be very nice because it seems the body has about a meter or so depth in it.

anyway, in the mean time I spend a few months doing work for other people (RMS was completly right about what he said , when I bought the AC tig welder :" dont; let the word out or you'll be working on someone else's project for very long)

Just picked up on the twin SC, last week again. build up the final version of th cooler stack, made the intake manifold out of 3mm thick alloy, modified the front waterbridge, I now need to weld the box to the milled down lower intake manifold, and start welding the stack into that.
once that's finnished It;s pretty much done till the chassis actually gets here and the engine is in, till then I cannot make any intake piping, but that's also pretty straing forward.

adaptor and clutch will be next big thing.

piccies will come soon at work at the mo

grtz Thomas
 
Hey Justin I will try and look up a picture of the inlay detail on GD's orange demonstrator car, so you can see what I mean.
I had also never seen that before but was sold on it the minute I did.

one importand thing to mention, the factory called today, my chassis and other stuff to complet the mechanics ex brakes and shocks will be ready for collection on the 28th of may!!!!!!!!!!!!!!! happy man now!

next up is the welding sesion on the manifold and IC's

Grtz Thomas
 
Thanx scott!

well I have been busy for a few days, here's the results

I made the intake collector box out of this 3mm alloy plate got some leftovers wich may be just enough to make a nice 2 liter fuel swirl pot aswell but that's not the isue right now.
I'm sorry to say that I forgot to make a picture of the box and all it's angle before welding it to the milled down lower intake manifold,
biggest hurdle to overcome was NOT having a plate bending brake, not wanting to pay for one as it has to go away again because of space issues, so I made up one with a few old parts I had lying around, it's not fancy but gets the job done. (there's that hard-wood you mentioned earlier Mr Cribb, haha)
so this:
alloy%20plate%20material.jpg

via this
DIY%20bending%20brake.jpg

went into this within a half days work
intake%20collector%20box%20welded%20up.jpg

next up was getting the final assembly of the laminova housing done, this ment drilling the holes through the flanges where the tubes sit in and though the 30mm thick collant collectors at once to get a nice fit, first up was a 3,2mm drill so I could tap the flanges to M4, then the blocks got 4.2mm holes to give enough clearance to take the collector of again to fit the gaskets later on, and to fit the laminova cores offcourse.

so this:
blokken%206061T6%20watercollerctor.jpg

went into this (forgot to take loose piccies again but you get the point)
who can spot the F**kup I made, now be gentle....... WOOT
xchanger%20finnished%20with%20coolant%20collectors.jpg

after that was the trial fit of the housing into the box, a bit of filing and fun with the dremel got me here:
test%20fit%20cooler%20stack%20in%20intake%20box.jpg

and the the big welding session was in order, I was not looking forward to this at all, I have the AC tig for only a short while and have not had much pratice buy any standard, so mixing and matching with the settings payed off, the welds are not all looking very nice, the straight beads are ok but there's some very nasty angles on the box on which the weldbead cannot be build up to much (stack of dimes rimple) because then the different parts cannot be dismantled later on. man this gave me the shivers.... one mistake and weeks of work are down the drian!

anyway results
rear:
inlaat%20achterkant.jpg

frontview and test whether the coolant collector would still come of the thing, I was worried sick that the heat generated would warp the alloy so much the 0.2mm play in the M4 threads would be insufficient, and I had to swaw it off. the reason that the threads runn all the way though the box it that this way even if any of the inside lock-bolts ever decides to come loose it will never be able the enter the combustion chambers of the engine.
anyway it didn't:
test%20removal%20of%20coolant%20collector.jpg

next on was the test if the modified front waterbridge was still clearing the intake manifold, well no to be exact it barely touches it but still, a quick session on the mill solved it nicly.

result:
with%20waterbridge.jpg

and in the end there where only to things to find out, what about the injector rails. I would like to use the stock ones because they're cheap!

they fit:
top%20view%20engine.jpg

and what about the bonnet clearence, I know the top part of the intake hasn't been build yet but I need at least 17mm to keep in line with the "audi R8 Lemans 24H twin turbo engine"
I'm roughly copieng their intake which feeds air in via the side's at the top of the manifold instead of welding a tube straight on it, in order to build it very low.
look in the red circle:
R8%20intake%20detail.jpg

so the air will enter via 15mm high slots over the complete lenght of the stack on both sides. so 15mm times 380mm is 5700mm/sq that times 2 gives a combined inlet area of 11400mm/sq which is big enough to pass twice the amount of air needed to make the horses I'm shooting for.

I calculated the hight on both sides about 6 months back and worried since if I would make it.
20mm's above the stack, and the stack floats around 35mm above the peer shaped intakes, inside the mani. e voila 20mm's for you sir?

still%20enough%20bonnet%20clearence.jpg

so that's where I am now, I need to wait till the chassis gets here to diced the final position on the chargers. Maybe the fit maybe the don't, then I can decide on the piping path and start to build that up.

that's all folks!

Grtz Thomas
 
Fresh aluminum and stainless in the morning. What a turn on..... :wink:


p.s. Thomas, how did you manage to turn solid blocks of 30mm ally into header tanks? ;-)
 
Nice progress! I cant spot the screw up in less it has somthing to do with that extra block of aluminum in the back ground.
 
Ah yes..... busted!

I had to do both the 4 hole flanges and the blocks of alloy twice to get it to fit well enough too: remove the block from the long threaded ends after having had them torqued up.... would want to drill larger oversize than the 4.2 in regard to probable gasket failures later on.

was pretty fed up with myself when I found out I could not get them block of the flange with the first set> I have quite a nice comumn drill with a very nice cross table and still the holes didn;t line properly.... maybe a beer to many in Le garage that night!:yup:

@Cribbj they are still in the solid 30mm alloy block stage, but MR mill will take car of getting a half decetn waterpassage in them, shouldn't take to long.
I have got the mill up and running pretty smooth by now and it churns through T6 like nothing I am used too, with a 10mm 2 flute end mill in the head and the
"1989 Toyota corolla windscreen wiper bottle and cuttingfluid/coolant - pump/filter/canister Apperatus" that I just aplied patent upon. pumping cooloant over the part. (scottisch enough?)
if not: the presure of the fluid is controlled by voltage from a inner piece of electronics of my old cordless drill :-)!

it really works like a dream.

grtz Thomas
 
Very nice indeed.
 

Attachments

  • chris sump 033.jpg
    chris sump 033.jpg
    170.2 KB · Views: 38
  • chris sump 034.jpg
    chris sump 034.jpg
    135.1 KB · Views: 32
  • chris sump 035.jpg
    chris sump 035.jpg
    168.3 KB · Views: 30
  • chris sump 036.jpg
    chris sump 036.jpg
    152.9 KB · Views: 33
hey matt, would not have been possible without your help!

how's the one for the LS (12core iirc) comming along? any results yet?

grtz Thomas
 
hey matt, would not have been possible without your help!

how's the one for the LS (12core iirc) comming along? any results yet?

grtz Thomas


No data on the 12 core yet, but this 4 core unit was fully tested pre and post install. 26% power increases and 29% more torque. Were just about to install the bolt on version of it and start testing that. See link below.

http://www.patrol4x4.com/forum/showthread.php?t=24057&highlight=laminova

100_6432.jpg 100_6329.jpg

On this.

http://forums.bimmerforums.com/forum/showthread.php?p=16360381#post16360381I

I wont clutter your build thread with pics.
 

Attachments

  • 100_6432.jpg
    100_6432.jpg
    46.9 KB · Views: 0
hey matt,

yours are looking absolute flawless, is that all CNC or conventional machining, and if so what lathe and mill has been used to get this results?

btw what are these for? I hope not nitrous..... hate that!
100_6459.jpg

grtz Thomas
 
All CNC now, bought myself Turbo Cad and started with a square then a cube then a circle then a circle in a cube then a sphere in a cube and now this 8 weeks later.

M3.jpg

The injectors are water/meth.

Regards Matt
 
hey matt, very neat! working like that,

but part of my hobby is making stuff with my hands, so for me it would be conventional all the time, then again maybe if I ever get feeling with CAD i would do it like yours also,

anyway, next week we will go to GD in the UK to pick the chassis up Yippie!

grtz Thomas


Back
Top