This article is intended to be a roadmap for anyone considering changing their early 1UZ valve train from the OEM Shim Over Bucket (SOB) setup to a Shim Under Bucket (SUB) setup. I have now done this on two early 1UZ’s for two different extreme cases (one which had excessive clearance between the cams and valve stems, as a result of changing from OEM cams to regrinds, and one which had very tight clearances, as a result of changing from regrinds to Kelfords with OEM base circle).
It is assumed that the reader is familiar with overhead camshafts, and the solid mechanical lifters known as “buckets”, and understands the principles of adjusting their clearance.
Why SUB?
First, why change the OEM SOB setup at all? It works, it’s OEM, so what’s the problem? This is a valid question because changing to SUB is not a cheap proposition, it definitely complicates the shimming operation, and it does nothing to increase the HP of the motor.
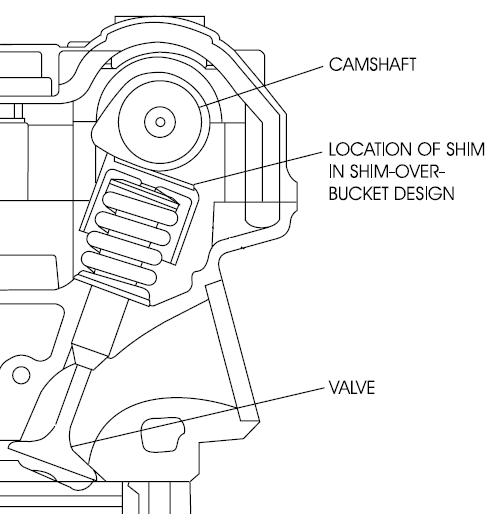
Here is a diagram showing a typical SOB setup:
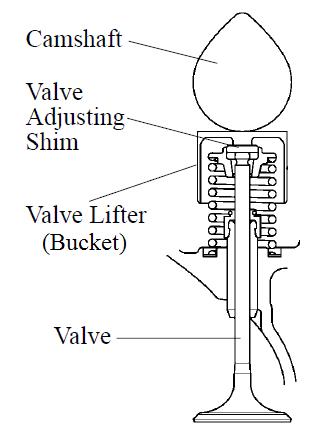
And here is a diagram of a SUB setup:
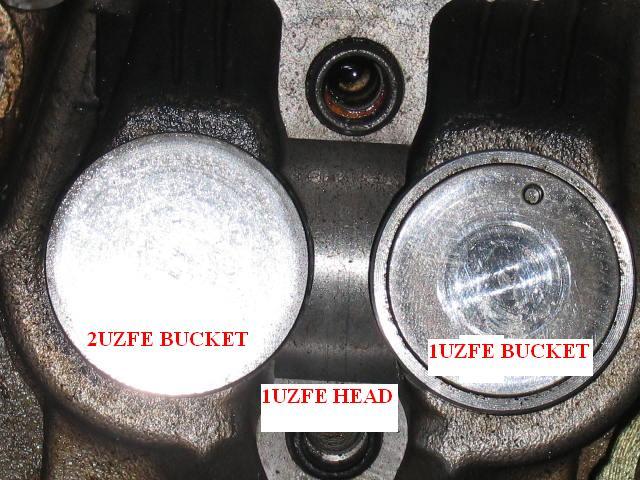
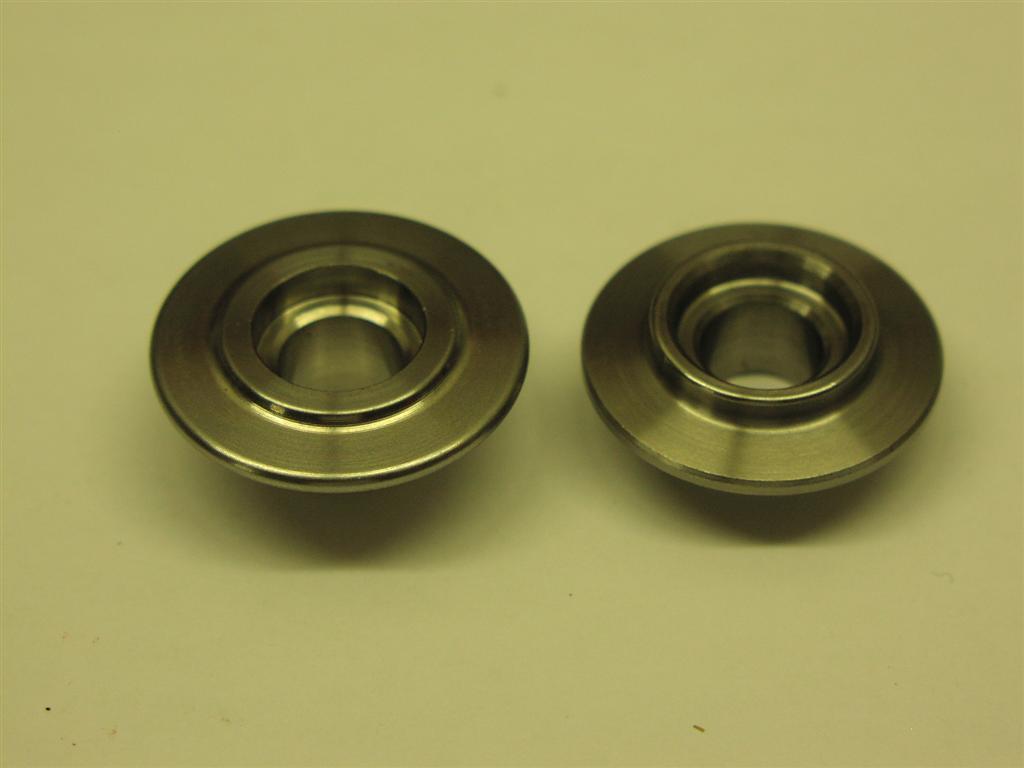
Here is a photo showing a SUB on the left, and a SOB on the right:
So what’s the big deal about moving the shim from on top of the bucket to under the bucket?
There are several drawbacks with the OEM SOB setup from a performance point of view:
- There is a limited range of shims available from Toyota. If reground cams are installed, thicker shims will be required, and may not be available.
- Very thick shims sitting in the tops of the buckets can, under certain circumstances, be “scooped up” by the cam lobes and “spit” out. Having a tool steel hardness shim bouncing around in the top of the head while the engine is running is definitely not a good thing, and will soon cause some damage.
- Having high lift cams with stronger springs operating on 29mm steel shims sitting in 31mm aluminum buckets, can under certain conditions, cause the aluminum bucket to fatigue and fail.
So, changing from SOB to SUB should be considered whenever:
- You’re thinking about changing camshafts and are considering regrinds, or cams which have a different base circle than the stock cams.
- The new cams will have a higher lift than the stock cams
- You want to take your engine above 7500 RPM (better consider some new rods too!)
Toyota realized that SUB was a better, safer setup, and have built their later engines with either SUB or shimless buckets, however both setups have a major drawback whenever the heads are rebuilt, in that the initial shimming operation will take at minimum 3x longer than the SOB setup, because the cams have to come out each time a shim is changed
Converting an earlier SOB setup on the 1UZ engine to the later OEM SUB setup is difficult and expensive because:
- For the majority of their new generation of engines (VVTi controlled) with SUB setups, Toyota have changed to valves with 5.5mm stems, so none of these setups will work with the 6mm valve stems of the early 1UZ engine. Toyota offered only one SUB setup for older engines with 6mm valve stems, and this was the European version of the 3SGTE. This is an OK solution for people outside the USA, but none of these parts are available, or can be ordered from US based Toyota dealers (as confirmed by Curt Aigner of Elmhurst Toyota).
So for the USA 1UZ SUB application, this means going to the aftermarket, doing some research, and mixing & matching parts. For the most part, this has already been done, and it’s now known what works and what doesn’t.
- It’s expensive (see the recap table of costs at the end of the article) because all the buckets, shims, and retainers have to be replaced, and probably the valve springs, as well.
Which Buckets?
Once it has been decided to change to SUB, the next decision is which type of bucket to use? There are “standard” Toyota 2UZ and 3UZ buckets available for the OEM SUB setups that will work, and there are also Toyota “shimless” buckets available, which are used in the SZ and NZ (Prius) engines. Shimless buckets are equipped with a special inner pad that contacts the valve stem directly, and these contact pads are ground to a precise depth, so each bucket’s thickness (installed height) is different. The thickness of each bucket is laser etched in the interior
The advantage in using a shimless bucket is that no shims are necessary, which reduces the cost and complexity of the valve train, however, if a bucket to cam clearance measurement isn’t correct and a shimless bucket requires replacement, its cost is around $12 vs only $4 for a shim. If many measurements are missed, it can quickly get expensive, and most dealers don’t have a wide range of these in stock.
There is also a third solution, which I like to call Hybrid Shimless, because it uses both shimless buckets and shims. One condition of using this solution is that the retainers used must be equipped with shim “niches” in their tops, but this will be discussed and explained in the Which Retainer? section. The advantage of this solution is to extend the range of possible shimming on both the high side, as well as the low side. The range of cam lobe to valve stem clearances that can be accommodated with standard buckets and shims from Toyota is from 7.42 to 8.22mm’s. The range of thicknesses available with “shimless” buckets is only from 5.06 to 5.74mm.
Using the Hybrid Shimless solution, and by combining the thinnest shim available, with the thinnest shimless bucket, one can then have a minimum thickness of 7.06mm. And likewise, by combining the thickest shim available with the thickest shimless bucket, one can have a maximum thickness of 8.56mm. It’s easier to picture all this graphically:
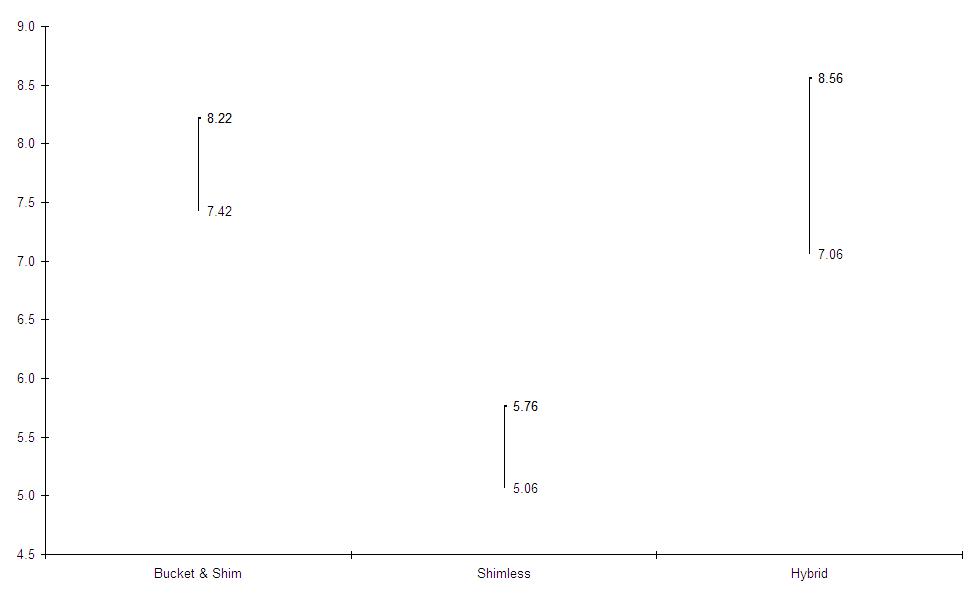
Now one might ask “OK, but what about that gap between 5.76mm and 7.06mm? What do I do if my clearances fall in this range?” Glad you asked – I already had an engine fall in this range myself and was wondering whether I would have to scrap all the valves, and start over again (the valve stems had already been ground down to the minimum height.) Fortunately Precision Shims in Australia came to the rescue and were able to manufacture shims thinner than those normally available from the OEM, so the shimming range could be extended down to 6.25mm. Any thinner than that would probably require experimenting with different retainers to expose more of the stem so it could be ground.
So, as you can see, the Hybrid Shimless solution offers more flexibility than the standard 2UZ or 3UZ bucket, especially when extended range shims are required.
Which Retainers?
Finding a suitable retainer that accommodates shims on top, as well as 6.0mm valve stems is quite a challenge. As mentioned previously, the Toyota 3SGTE retainers can be used, however these are only a good solution outside the USA as these parts were not used on USDM engines. Additionally the spring step on these retainers will likely require to be turned down, as it will be too large for many springs that fit the UZ.
The Nissan RB26 engine uses a SUB valve train, and 6.00mm valve stems, as well as 31mm diameter buckets (same as UZ), so its parts are good candidates. Unfortunately, as with the 3SGTE retainers, neither this engine, nor its parts were imported to the US, however several USDM valve manufacturers offer aftermarket parts for it, such as Manley, Ferrea, and Supertech.
Both Ferrea and Supertech are into dual springs, and the RB26 retainers they sell are designed for them. Manley offers only a single spring, SUB type Ti retainer. Dual valve springs are just not practical with the 1UZ due to its very narrow valve spring seats, so the Manley Ti retainer gets the nod from a practical as well as an economic perspective.
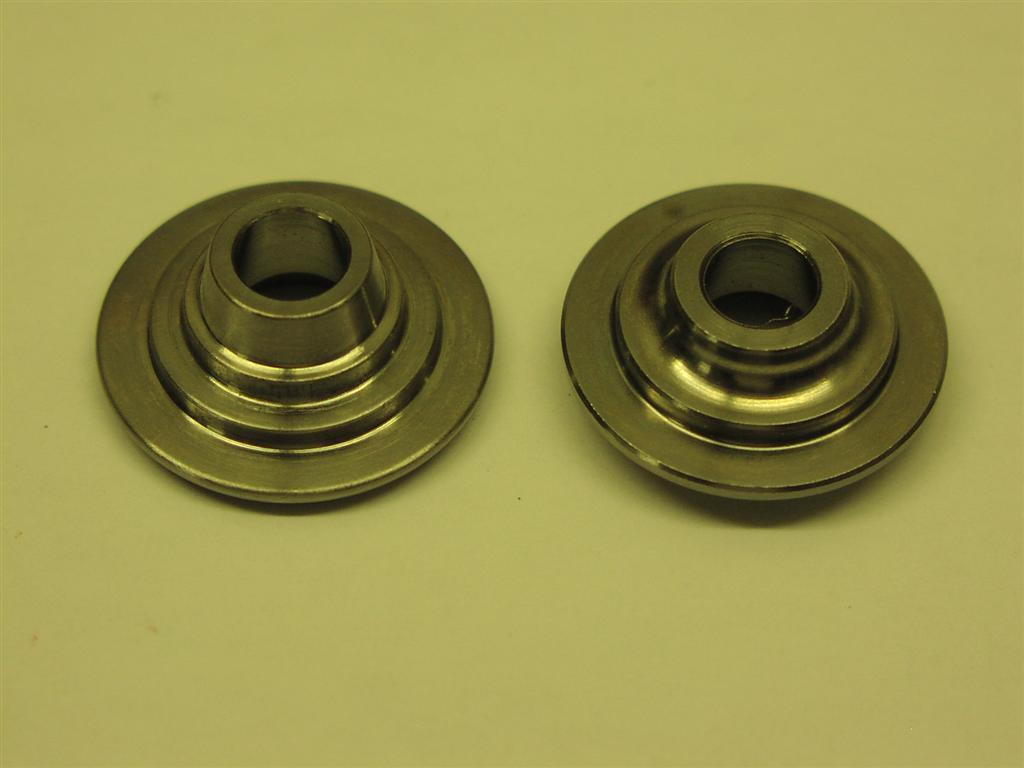
A couple of photos showing the Supertech (left) and Manley (right) retainers. These photos show the shim perches very well in the tops of the retainers.
Although the Supertech is designed for dual springs, it would still work with only a single, however the depth of the body is a bit disturbing, as it is liable to foul the valve seal sitting on top of the guide much sooner than the Manley. So the Manley has an advantage in that it can be used with higher lift cams than the Supertech.
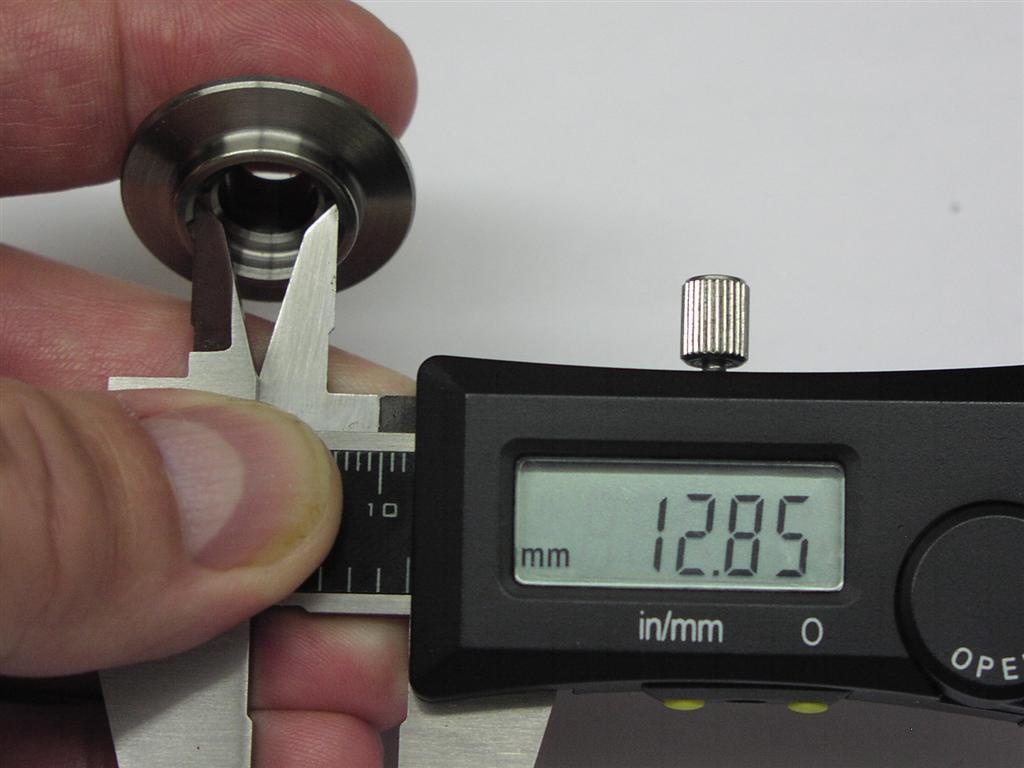
The Manley retainer has a shim perch that is 12.85mm in diameter:
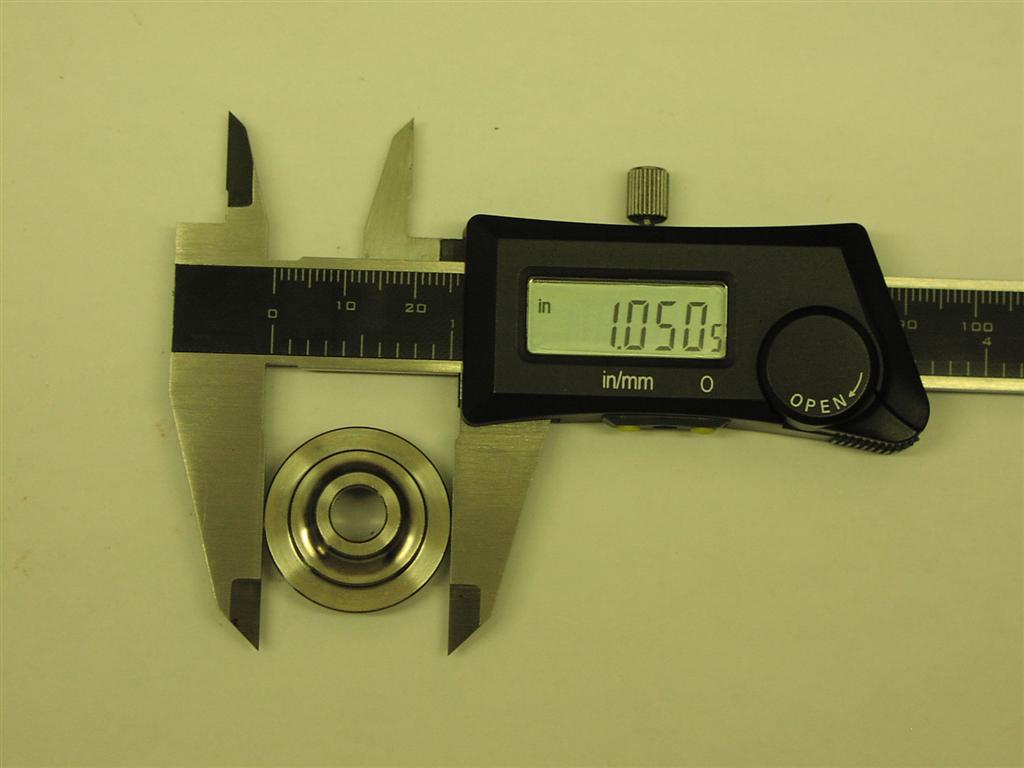
Overall OD of the Manley showing that it will fit just fine in the 31mm (1.22”) lifter bores of the UZ engines:
OD of the spring step for the Manley (this can easily be turned down to a smaller OD for thicker springs, which is what we had to do for the last engine):
OK, Which Springs?
Conventional wisdom dictates that the valve springs should be purchased with the cams, and naturally the cam manufacturers would prefer this too. However for a Frankenstein setup like this SUB conversion, the cam manufacturer just doesn’t have enough data to pick the right springs, so we wound up picking several springs that we knew wouldn’t cause installation problems, then running their spring rates and seat pressures by Kelfords for their approval. As luck would have it, Kelfords agreed with all our choices, so we chose the optimum one, which turned out to be a Ferrea spring for a turbo Scion setup.
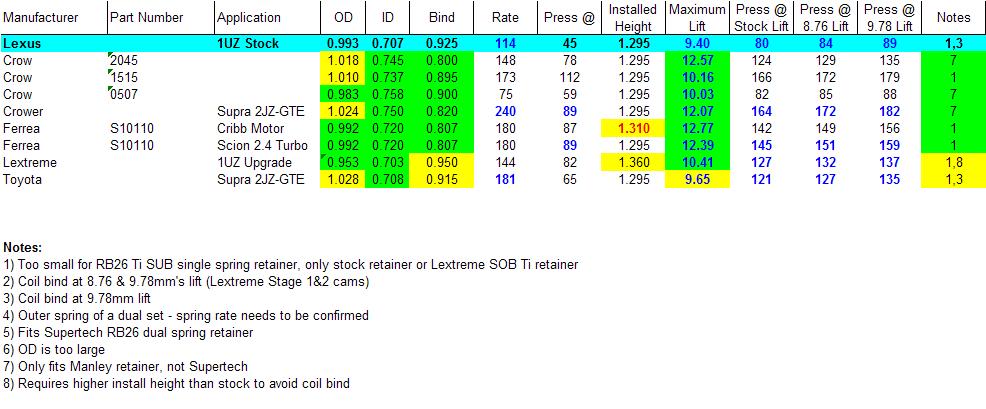
In my opinion, the trick with picking a good valve spring is to ensure it has sufficient seat pressure to keep the valve closed under all conditions (including high boost), a high enough rate that it’ll close quickly, without bouncing, and a low enough bind height that it’ll have a maximum lift figure that is well in excess of the highest lift cam you’ll use. Of course it also has to fit the spring seat of the head, as well as the spring step of the retainer (however the retainer spring step can be modified if necessary)
Some would say with a seat pressure of only 90 lbs, and a rate of only 180, these Scion springs are too light for a performance application, however it must be remembered that the heavier the spring, the more work the cams have to do to open them, and the 1UZ cams have been known to shear their single drive pins on occasion. Therefore there is good rationale for keeping the springs relatively light, and just strong enough to do the job.
Now the fun part: calculating the shims, and deciding which bucket configuration to use
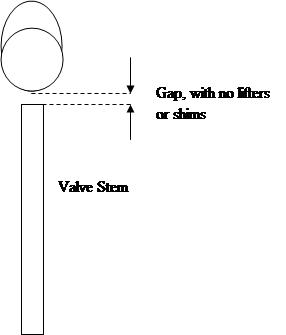
In this step, the heads must be assembled with the valves, springs & retainers, but without any buckets, and the cams must be set in place. Then using extra thick feeler gauges, you should measure all the stem to cam gaps and record them; these gaps will determine the type of bucket & shim arrangement you can use. Here is an illustration of the gap that must be measured:
Following is the actual table of gaps from the last engine we built:
| Valve Stem to Camshaft Clearances |
|
|||
|
Cyl |
I1 |
I2 |
E1 |
E2 |
|
1 |
7.188 |
7.163 |
7.163 |
6.985 |
|
3 |
7.010 |
7.239 |
6.858 |
7.036 |
|
5 |
7.188 |
7.264 |
6.960 |
7.010 |
|
7 |
7.163 |
7.290 |
7.061 |
6.960 |
|
|
|
|
|
|
|
2 |
7.061 |
7.036 |
6.883 |
6.883 |
|
4 |
7.112 |
6.985 |
6.807 |
6.985 |
|
6 |
7.036 |
7.010 |
6.883 |
6.934 |
|
8 |
6.985 |
7.137 |
6.960 |
7.010 |
Hopefully, your head builder has installed all the valves with relatively the same stem heights, so there shouldn’t be more than a millimeter of difference between them.
Once you have a table of gaps, you should deduct the median amount of valve lash to determine the net thickness of bucket+shim that is necessary. For intakes, deduct 0.20mm, and for exhaust gaps, deduct 0.30mm.
Now you should have a table of “net” gaps, and if they all exceed 5.74mm, then the shimless bucket solution can be eliminated.
| Stem to Cam with Lash taken Out (.20 Intake, .30 Exhaust) | |||||
|
Cyl |
I1 |
I2 |
E1 |
E2 |
|
|
1 |
6.985 |
6.960 |
6.858 |
6.680 |
|
|
3 |
6.807 |
7.036 |
6.553 |
6.731 |
|
|
5 |
6.985 |
7.061 |
6.655 |
6.706 |
|
|
7 |
6.960 |
7.087 |
6.756 |
6.655 |
|
|
|
|
|
|
|
|
|
2 |
6.858 |
6.833 |
6.579 |
6.579 |
|
|
4 |
6.909 |
6.782 |
6.502 |
6.680 |
|
|
6 |
6.833 |
6.807 |
6.579 |
6.629 |
|
|
8 |
6.782 |
6.934 |
6.655 |
6.706 |
|
Hopefully, the “tightest” clearance is greater than 6.5mm, and the “loosest” is less than 8.56mm. If the gaps fall into these ranges, then by using special shims from Precision Shim, a Hybrid Shimless solution can be used. If you have any gaps tighter than 6.5mm, then you’ll have to grind the top of those valve stems to get a looser gap of at least 6.5mm.
As it is preferred (for sake of consistency) to use a single thickness of shimless bucket, the next step is to construct multiple tables, starting with the thinnest (5.06mm) shimless buckets, and then using progressively thicker shimless buckets to see where the range of shims falls. If any resulting shim thicknesses are less than 1.5mm, you have found the thickest shimless bucket to be used. A 1.5mm shim is a very thin shim, and should be considered the lower limit of custom shim to be ground.
So here is the first table of shims needed when the thinnest, 5.06mm shimless buckets are used:
| Shim Sizes Needed, assuming thinnest (5.06) Prius buckets used | ||||||
|
Cyl |
I1 |
I2 |
E1 |
E2 |
||
|
1 |
1.925 |
1.900 |
1.798 |
1.620 |
|
|
|
3 |
1.747 |
1.976 |
1.493 |
1.671 |
|
|
|
5 |
1.925 |
2.001 |
1.595 |
1.646 |
|
|
|
7 |
1.900 |
2.027 |
1.696 |
1.595 |
|
|
|
|
|
|
|
|
||
|
2 |
1.798 |
1.773 |
1.519 |
1.519 |
|
|
|
4 |
1.849 |
1.722 |
1.442 |
1.620 |
|
|
|
6 |
1.773 |
1.747 |
1.519 |
1.569 |
|
|
|
8 |
1.722 |
1.874 |
1.595 |
1.646 |
|
|
From inspection, it can be seen that several shims are thinner than 1.5mm, and none are thicker than 2.50mm, so there is no need to go to a thicker shimless bucket. In fact the shims thinner than 1.5mm will have to be specially ground, and may incur additional cost.
The next step is to rationalize the shim table into more common sizes, using increments of 0.02mm to come up with a table of shims required. If rounding is required, it is better to round down on the thickness, because after installation and “bedding in”, valve clearances may “tighten”, but they will never loosen:
| Shim Sizes Selected | ||||
|
Cyl |
I1 |
I2 |
E1 |
E2 |
|
1 |
1.920 |
1.900 |
1.800 |
1.620 |
|
3 |
1.740 |
1.960 |
1.500 |
1.660 |
|
5 |
1.920 |
2.000 |
1.600 |
1.640 |
|
7 |
1.900 |
2.020 |
1.700 |
1.600 |
|
|
|
|
|
|
|
2 |
1.800 |
1.760 |
1.520 |
1.520 |
|
4 |
1.840 |
1.720 |
1.440 |
1.620 |
|
6 |
1.760 |
1.740 |
1.500 |
1.560 |
|
8 |
1.720 |
1.860 |
1.600 |
1.640 |
Now plug these shim sizes back into the original table, with the 5.06mm shimless buckets selected, to get the total installed thickness of buckets and shims:
| Bucket + Shim Thickness | ||||
|
Cyl |
I1 |
I2 |
E1 |
E2 |
|
1 |
6.980 |
6.960 |
6.860 |
6.680 |
|
3 |
6.800 |
7.020 |
6.560 |
6.720 |
|
5 |
6.980 |
7.060 |
6.660 |
6.700 |
|
7 |
6.960 |
7.080 |
6.760 |
6.660 |
|
|
|
|
|
|
|
2 |
6.860 |
6.820 |
6.580 |
6.580 |
|
4 |
6.900 |
6.780 |
6.500 |
6.680 |
|
6 |
6.820 |
6.800 |
6.560 |
6.620 |
|
8 |
6.780 |
6.920 |
6.660 |
6.700 |
Then subtract the above table, from the original table of gaps measured, to get the actual valve lash, and confirm that it falls between 0.15 and 0.25mm on the intake side, and between 0.25 and 0.35mm on the exhaust side:
| Final Lash | ||||
|
Cyl |
I1 |
I2 |
E1 |
E2 |
|
1 |
0.21 |
0.20 |
0.30 |
0.31 |
|
3 |
0.21 |
0.22 |
0.30 |
0.32 |
|
5 |
0.21 |
0.20 |
0.30 |
0.31 |
|
7 |
0.20 |
0.21 |
0.30 |
0.30 |
|
|
|
|
|
|
|
2 |
0.20 |
0.22 |
0.30 |
0.30 |
|
4 |
0.21 |
0.21 |
0.31 |
0.31 |
|
6 |
0.22 |
0.21 |
0.32 |
0.31 |
|
8 |
0.21 |
0.22 |
0.30 |
0.31 |
All valve lashes are well within the parameters specified by Toyota, so the shim calculations are acceptable, and you can order the thicknesses calculated, along with a quantity of spares of various sizes to ensure you have plenty, in case of loss, or a mistake in measurement.
In this engine’s case, here are the shims that were purchased:
|
Shim |
Qty Rqd |
Spares |
|
1.420 |
0 |
1 |
|
1.440 |
1 |
|
|
1.500 |
2 |
|
|
1.520 |
2 |
|
|
1.560 |
1 |
|
|
1.600 |
3 |
|
|
1.620 |
2 |
1 |
|
1.640 |
2 |
1 |
|
1.660 |
1 |
1 |
|
1.680 |
0 |
1 |
|
1.700 |
1 |
1 |
|
1.720 |
2 |
1 |
|
1.740 |
2 |
1 |
|
1.760 |
2 |
|
|
1.800 |
2 |
|
|
1.840 |
1 |
|
|
1.860 |
1 |
|
|
1.900 |
2 |
|
|
1.920 |
2 |
|
|
1.960 |
1 |
|
|
1.980 |
0 |
1 |
|
2.000 |
1 |
|
|
2.020 |
1 |
|
|
2.040 |
0 |
1 |
|
|
|
|
|
Totals |
32 |
10 |
And here is a final recap of the costs for the SUB conversion:
| Description |
P/N |
Qty |
Ea |
Total |
Notes |
| Manley RB26 Ti Retainers | 23175-32 |
32 |
$11.95 |
$382.55 |
1 |
| Ferrea Turbo Scion Valve Springs | S10110 |
32 |
$19.23 |
$615.32 |
1 |
| Precision Shims for RB26 (12.30mm) | No P/N |
42 |
$9.88 |
$415.00 |
2 |
| Toyota Prius Shimless Buckets (5.06mm) | 13751-22040 |
32 |
$12.07 |
$386.24 |
|
|
|
|
|
|||
|
Total |
$1,799.11 |
||||
| Notes: | |||||
| 1) Including domestic US Freight Charges | |||||
| 2) Including freight from Oz |
As you can see from the costs, this is not a cheap mod, however it’s good insurance whenever high lift cams are to be used, or the engine will be seeing high RPM duty.
John Cribb